How to Use AirDrop to Quickly Send Photos and Files
This might be one of Apple's best features.


- Named a Tech Media Trailblazer by the Consumer Technology Association in 2019, a winner of SPJ NorCal's Excellence in Journalism Awards in 2022 and has three times been a finalist in the LA Press Club's National Arts & Entertainment Journalism Awards.


- Patrick's play The Cowboy is included in the Best American Short Plays 2011-12 anthology. He co-wrote and starred in the short film Baden Krunk that won the Best Wisconsin Short Film award at the Milwaukee Short Film Festival.

AirDrop is a fast, simple way to transfer files, photos, videos and other data from one Apple device to another.
If you're still emailing photos or using a USB thumb drive to transfer files across Apple devices, let me introduce you to AirDrop. AirDrop is a fast and easy way to share photos, files and links between your iPhone, iPad and Mac. Ever since switching from an Android phone to an iPhone over a year ago, AirDrop has quickly become one of my favorite features within the Apple ecosystem.
The beauty of AirDrop is how it works seamlessly across many different types of content. You can share photos, documents, videos, audio recordings, contact cards, web links and notes (among other things) quickly and painlessly between Apple devices. I equated it to magic the first time I saw it in action.
AirDrop is limited to iOS and MacOS (Sorry, Android and PC users). When it debuted in 2012, it was one of the features that separated the iPhone from Android phones. If you are team Android, you can use a feature called Quick Share, which does something similar.
You don't even need the latest iPhone 15 or M3 MacBook Pro to use AirDrop. It works with any iOS device running iOS 7 or newer and any Mac running OS X Yosemite or newer. The only "requirement" is that both devices are within 30 feet of each other and have both Wi-Fi and Bluetooth turned on. So far as I can tell, there isn't a limit to the size of the file you AirDrop. Just know that the bigger the file, the longer it will take to transfer.
Check out the video below to see a step-by-step tutorial on setting up and using AirDrop.
How to turn on AirDrop
From an iPhone, make sure Wi-Fi and Bluetooth are both turned on. Next, open the Control Center panel, then push and hold the wireless connection icon until it expands into a rectangle. Last, tap AirDrop and choose from Receiving Off, Contacts Only or Everyone for 10 Minutes to control who can send files to your phone.
On a Mac, check that you have Wi-Fi and Bluetooth enabled. Open a Finder window. Then, from the sidebar click on AirDrop. A window will open with a radar-like graphic. Anyone nearby with AirDrop enabled will appear in this window. At the bottom of the window, you can select who can send stuff to you: No One, Contacts Only or Everyone.
How to AirDrop on an iPhone
To use AirDrop on an iPhone, the person you're sending files to needs to have an Apple device with Wi-Fi and Bluetooth turned on. If either of you has a Personal Hotspot enabled, turn it off, otherwise AirDrop won't work. The same is true if you're using a VPN. It's not clear why this is, but it might have something to do with the way a VPN encrypts your internet connection.
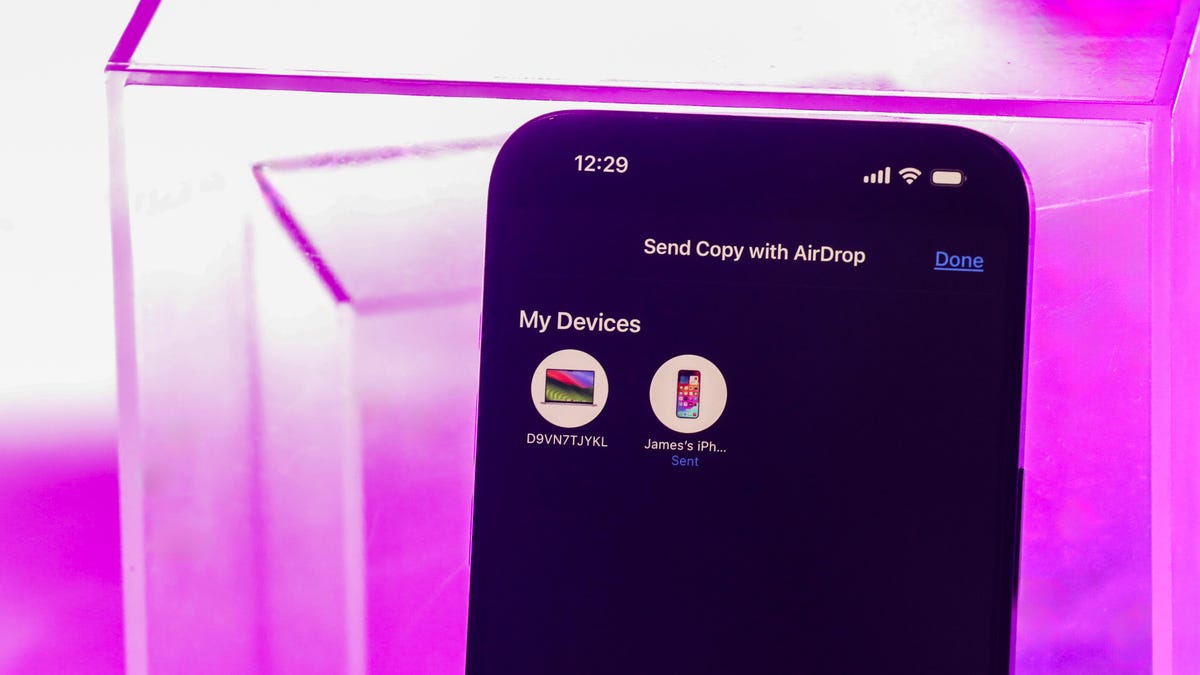
Anytime you see a Share button on your phone (the rectangle icon with an arrow pointing up), you can use AirDrop. For example, if you wanted to send an image from the Photos app, select the Share button, then hit AirDrop. Next, a window will appear showing everyone with AirDrop enabled that you can send that photo to. Select the person you want to share with.
Next, a window alert with a preview of the content you're sharing will pop up on the recipient's phone. They have the option to Accept or Decline. Once they tap Accept, the photo you selected will be transferred. Pictures and videos are saved into the Photos app on the recipient's phone. Documents will prompt the receiver to choose an app to save them to. Web links will automatically open in your default web browser, which for most people will be Safari.
If the person you're sending to has their AirDrop set to Contacts Only, then they'll need to have a contact card in the Contacts app that has either your email address or phone number for this to work. If you're not in their Contacts, have them change their AirDrop preference to Everyone to receive your file.
In iOS, when you tap on the Share menu, a dialog box pops up showing people nearby with AirDrop activated. Tap on the person you want to share with.
You can also use NameDrop for a fun touch
With iOS 17, Apple debuted a new way to AirDrop, called NameDrop. This lets you share contact information as well as photos and videos between two iPhones by just bringing them close together. The catch here is that both people will need iOS 17 or later, and this only works on iPhones, not Apple's other suite of products.
To enable NameDrop, go to Settings > General > AirDrop, then hit the toggle next to Bringing Devices Together. Now you can quickly share contact information or other content by holding the top of your phone close to another iPhone.
How to AirDrop on a Mac
To start, make sure your Mac's Wi-Fi and Bluetooth are both on, then open a Finder window. Next, from the sidebar click on AirDrop. To share a file, simply drag and drop it onto the contact icon for the person you want in the AirDrop window. Also, just like on iOS, you can access AirDrop any time you see the Share button.
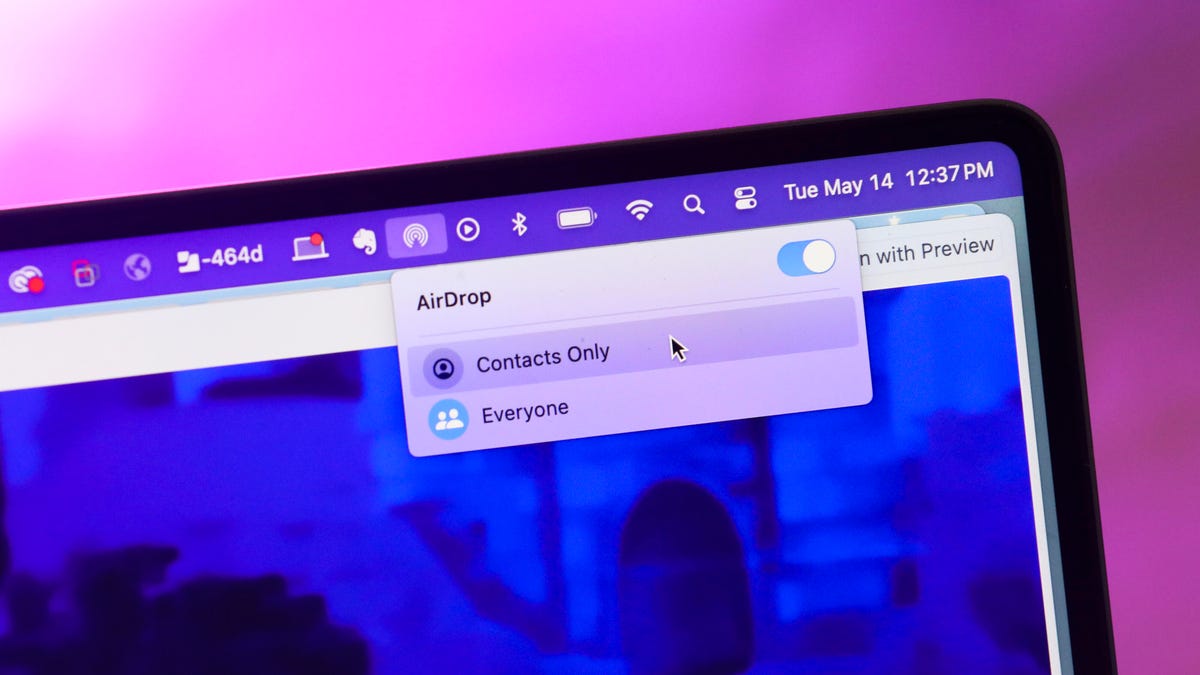
You can choose whether to accept AirDrop content from just your contacts, or from everyone.
How to AirDrop from iPhone to Mac (or vice versa)
If you want to AirDrop a link or photo from an iPhone to a Mac, for example, go to that webpage and open the Share menu, then tap the AirDrop icon. Next, select the name for the device you want to send the link to. The recipient's Mac will show a prompt informing them of incoming media, asking them to Accept or Decline. Once they tap Accept, the weblink will transfer and open in their default web browser, and the photo will be saved in a file. The same process applies for sharing videos, documents and more.
If you want to AirDrop from your iPhone to your Mac, and both are signed into the same Apple ID, you won't see an option to Accept or Decline. The transfer will just happen.
How to change your AirDrop name
Your AirDrop name is the same as your general device name. To check it or change it on an iPhone, open Settings. Tap General, then tap About. The first item in the list shows the current name of your iPhone. Simply tap to change it.
Now that you've mastered the art of AirDrop, check out these hidden iOS 17 features to make the most of your iPhone.